Outline
- Tutorial preparation
- Bulldozer context
- How Bulldozer works?
- Run Bulldozer
- Upcoming works
![]()
Tutorial preparation
Preparation
Requirements
- python>=3.8
- python-venv or virtualenv
- web access
Environment setup
It is recommended to install Bulldozer into a virtual environment, like conda or virtualenv.
Environment setup with virtualenv:
python -m venv bulldozer_venv
source bulldozer_venv/bin/activate
Jupyter notebook preparation
Install Jupyter packages in previous virtualenv:
pip install notebook rise bokeh
Build Jupyter kernel:
python -m ipykernel install --sys-prefix --name=bulldozer-kernel --display-name=bulldozer-kernel
Jupyter environnement:
jupyter notebook
![]()
Bulldozer context
Bulldozer, a DTM extraction tool

Bulldozer is designed as a pipeline of standalone functions that aims to extract a Digital Terrain Model (DTM) from a Digital Surface Model (DSM) without any exogenous data.
Main goals:
- offer an DTM extraction tool that doesn't require any other data (land cover map, water mask, etc.)
- process large scale DSM (scalability and stability)
- set of standalone functions: you can use the functions without running the full pipeline
- compatible with any raster format DSM
- easy to install, easy to run
Be aware that Bulldozer is new and still in devlopment. Feel free to communicate your needs to the team :)
License: Apache-2.0
Repository: github.com/cnes/bulldozer/
Projects context
Bulldozer was initially designed by the CNES in the AI4GEO project to handle large scale CARS DSM.
But now we aim to address more use cases like the DSM generated in the IGN Lidar HD project for example.
![]()
![]()
![]()
Authors
- Dimitri Lallement dimitri.lallement@cnes.fr
- Pierre Lassalle pierre.lassalle@cnes.fr
- Yanncik Ott yannick.ott@cnes.fr
See Authors.md for full contributions in Github repository.
Contributions
To do a bug report or a contribution, see the Contribution Guide.
For any help or suggestion, feel free to contact the authors.
Glossary
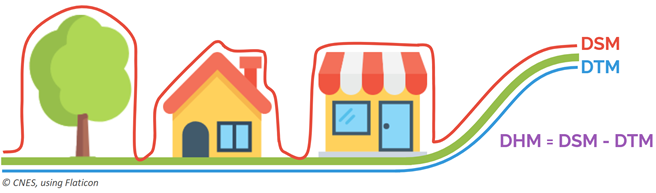
DEM: Digital Elevation Model. Usually means all elevation models in raster: DSM, DTM,…
DSM: Digital Surface Model. Represents the earth’s surface and includes all objects on it.
DTM: Digital Terrain Model. Represents bare ground surface without any objects like trees or buildings.
DHM: Digital Height Model. Represents the elevation of the foreground.
![]()
How Bulldozer works ?
Main concept
Bulldozer is based on a modified version of the multi-scale Drap Cloth principle:

Drap Cloth method

Tension process

Drap Cloth limits

- Nodata handling
- Noisy input DSM
- No landscape adaptation
- No consideration of the input DSM (resolution, size, etc.)
- Scalability and stability
- Computational performances
Bulldozer target
- Large scale DTM
- Without exogenous data
- Handles both photogrammetric and Lidar DSM
- Perfoms on noisy DSM
- Low complexity O(n) and scalable
- Outperforms existing methods
- Adapts to hardware ressources
- Accessible through a Python API
- Adaptative output resolution
Bulldozer compared to DrapCloth

Bulldozer pipeline
Bulldozer is designed as a pipeline of standalone functions that aims to extract a Digital Terrain Model (DTM) from a Digital Surface Model (DSM).
But you can also use one of the following function without running the full pipeline:
- DSM preprocessing
- Nodata extraction: a group of methods to differentiate and extract nodata related to failed correlations during the DSM computation and those of the image border
- Disturbed areas detection: a method to locate disturbed areas. These noisy areas are mainly related to areas in which the correlator has incorrectly estimated the elevation (water or shadow areas).
- DTM extraction
- DTM computation: the main method that extracts the DTM from the preprocessed DSM.
- DTM postprocessing
- Pits detection: a method to detect pits in the provided raster and return the corresponding mask.
- Pits filling: a method to fill pits in the generated DTM (or input raster).
- DHM computation: a method to extract the Digital Height Model (DHM).
Interfaces
Inputs
Bulldozer requires a raster format DSM file and an output directory (if the providing path doesn't exist, Bulldozer will generates it).
You can provides those data in the config file or by passing it in the Python API.
Outputs
Bulldozer will generate the DTM.tif file, the DHM.tif if you have activate the option, a quality_mask.tif and a log file.
![]()
Run Bulldozer
Quickstart
In order to run Bulldozer through the Command Line Interface (CLI), you have to create a configuration file.
You can download the configuration file from the tutorial repository:
mkdir /tmp/bulldozer_tutorial/
cd /tmp/bulldozer_tutorial/
wget https://raw.githubusercontent.com/cars-cnes/discover-cnes-3d-tools/gh-pages/data_turkey/config_bulldozer_pre_event.yaml
Run Bulldozer:
bulldozer --conf config_bulldozer_pre_event.yaml
Done!
Warning: Internet needed to download demo data.
Configuration file
Let's take a look at the configuration file structure.
The file is composed of four parts.
The first one is the main part (the only required elements in the config file):
#-------------------------#
#       Parameters        #
#-------------------------#
# [Required] - Input DSM path (expected format: "<folder_1>/<folder_2>/<file>.<[tif/tiff]>")
dsm_path : "outputs_cars_pre_event/cars_dsm_pre_event.tif"
# [Required] - Output directory path (if the directory doesn't exist, create it)
output_dir : "outputs_bulldozer_pre_event"
Configuration file
The second part is the options:
#-------------------------#
#         Options         #
#-------------------------#
# [Optional] - If True, generates the DHM (DSM - DTM) in the output directory
generate_dhm : True
# [Optional] - If null, the output DTM resolution will be the same as the input DSM (float value in meter)
output_resolution : null
# [Optional] - If null, bulldozer will use the maximum number of available CPU on your system
nb_max_workers : 16
Configuration file
The third part is for the experimented users. Let see that:
#-------------------------#
#    Advanced settings    #
#-------------------------#
# [Optional] - Foreground max object width (in meter)
max_object_width : 16
# [Optional] - If True, this flag allows snapping DTM values above the DSM to the DSM values in order to satisfy the property that DTM is always below the DSM.
check_intersection: False
# [Optional] - If null, the nodata value will be extracted from the input DSM (float value or nan)
nodata : null
# [Optional] - Minimum valid height value, None or a float value. If null this parameter is ignored
min_valid_height: null
# [Optional] - If True, keep the intermediate results
developper_mode : False
# [Optional] - If True, keep the intermediate DTM at each level of the pyramid
keep_inter_dtm : False
Configuration file
The last part is the core settings. We suggest to not modify those values:
#-------------------------#
# Bulldozer core settings #
#-------------------------#
# /!\ Modify those data at your own risk (it is suggested to keep the default values) /!\

# [Optional] - DetectDisturbedAreasAndFill part
slope_threshold : 2.0
# [Optional] - Number of evaluated axis. Vertical and horizontal if True else vertical, horizontal and diagonals.
four_connexity : True

# [Optional] - DtmExtraction parameters
uniform_filter_size : 3
prevent_unhook_iter : 10
num_outer_iter : 50
num_inner_iter : 10
mp_tile_size : 1500
Bulldozer Python API
You can run Bulldozer with Python API using the config file:
from bulldozer.pipeline.bulldozer_pipeline import dsm_to_dtm

dsm_to_dtm(config_path="conf/config_bulldozer_pre_event.yaml")
Or by providing directly the input parameters (missing parameters will be replaced by default values):
from bulldozer.pipeline.bulldozer_pipeline import dsm_to_dtm
# Example with a specific number of workers
dsm_to_dtm(dsm_path="outputs_cars_pre_event/cars_dsm_pre_event.tif", output_dir="outputs_bulldozer_pre_event")
Advanced usage

As we mentioned before, Bulldozer can also be used to launch in standalone the functions that compose the pipeline.
It can be helpfull if you want to detect disturbed areas (shadow, water, etc.) in a DSM, fill pits, etc.
For each step of the pipeline you can follow one of the tutorial notebook:
![]()
What's next?
Upcoming works
- External stability guarantee
- Full mkdocs documentation
- Publish unit tests
- Try to share the QGIS module through the marketplace
- Upgrade pits and disturbed areas detection